15 No-Hassle Hairstyles for Women main image
Scroll Down To Continue

15 No-Hassle Hairstyles for Women

Double Ponytail

Double Ponytail

Want a fuller, thicker ponytail? A double ponytail could be a fantastic option. For a voluminous look, make sure you tease your hair before beginning the following steps.

Double Ponytail

Double Ponytail

Step 1: Pull your hair into a half ponytail. Be careful not to make it too high or the other tail will show.

Step 2: Tie the remainder of your hair into another ponytail about an inch or two under the top tail.

Step 3: Finally arrange your hair where it hides the lower tail.

Tip: You can wrap your hair around the elastic bands to make it seamless.

Low, Knotted Bun

Low, Knotted Bun

The low knotted bun may look complicated, but it’s actually incredibly easy to achieve in less than 10 minutes.

Low, Knotted Bun

Low, Knotted Bun

Step 1: Braid your hair into a low ponytail and fluff out the braids by pulling each section gently.  

Step 2: Begin wrapping the braid around the base of your ponytail like a regular bun.

Step 3: Truck the end of the ponytail (the unbraided portion) and secure with bobby pins.

Stylish Headscarf

Stylish Headscarf

Love Rosie the Riveter? This look is inspired by one of our favorite icons. For this style, you'll need to begin with a bun. While a classic tight bun works, you can also get an easy bun using our "Messy Bun" tutorial. 

Stylish Headscarf

Stylish Headscarf

The hardest part of this style is folding the headscarf.

Step 1: Start by folding it into a triangle.

Step 2: Fold the top corner about a third of the way down.

Step 3: Finally, fold it one more time toward the center, but make sure not to fold it all the way to the edge.

Stylish Headscarf

Stylish Headscarf

Step 1: Wrap the headscarf around your head with the ends pointed upward.

Step 2: Tie it on top of your head in a secure knot.

Step 3: Fold the edges into the side of the scarf to hide the excess.

Beachy Waves For Short Hair

Beachy Waves For Short Hair

Beach waves may look intimidating, but here’s an easy way to achieve them with just hairspray. Start by letting your hair air dry. (Click through for the next steps.)

Beachy Waves for Short Hair

Beachy Waves for Short Hair

Step 1: Twist your hair in small sections above your head.

Step 2: Grab your favorite hairspray and give it a really good spritz.

Step 3: Gently shake it with your fingers to unfurl the curls.  

Messy Bun

Messy Bun

Messy buns are easier to make than you think—even if you have thinner hair.

Messy Bun

Messy Bun

Step 1: Start by gathering your hair into a ponytail, but stop before you pull it all the way through.

Step 2: Tighten the elastic band by pulling on the edges of the loop, but avoiding the extra hair at the end.

Step 3: Grab the remaining hair and twist it around the elastic band.

Step 4: Tuck the remaining hair into the elastic band or use bobby pins to make sure it stays in place.

Looped Bun

Looped Bun

The Looped Bun is an easy chignon that can be completed in less than five minutes (but looks like it took way more time and effort).

Looped Bun

Looped Bun

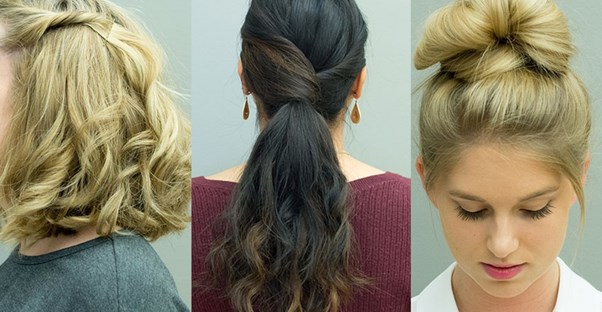
Step 1: Start with a simple low pony. Keep it loose so there’s a smaller gap between the back of your head and the tail.

Step 2: Pull the ponytail through the gap for an elegant twisted effect.

Tip: If you’re in a rush, you can stop here for an easier, but still up-scale look.

Step 3: Continue pulling the looped bun by pulling your ponytail through the gap.

Step 4: Stop before you pull it all the way through and use bobby pins to keep it in place.

Twisted Bangs

Twisted Bangs

Growing out your bangs is a pain, but this look gets the hair out of your face in a stylish way. 

Twisted Bangs

Twisted Bangs

Step 1: Grab the front portion of your hair and pull it toward the back of your head.

Step 2: Begin twisting the hair as much or as little as you want.

Step 3: Use bobby pins to hold the bangs in place.

Tip: You can use two bobby pins or decorative hair pins for an extra stylish look.

Easy Curls

Easy Curls

Curling your hair can take 30+ minutes depending on how long your hair is, but there is a much, MUCH easier way. All you need is a hairband and a curling iron.

Easy Curls

Easy Curls

Step 1: Put your hair into a ponytail and section it off.

Step 2: Begin curling your hair one section at a time.

Step 3: Let your hair down for some beautiful curls.

Tip: You can always keep your hair up for a classy pony.

Elegant Ponytail

Elegant Ponytail

This ponytail may look incredibly elegant, but it's actually a super simple look to achieve!

Elegant Ponytail

Elegant Ponytail

Step 1: Part your hair into three sections.

Step 2: Crisscross the two side pieces over one another.

Step 3: Pull the two sections under your ponytail and secure with an elastic band.

Braided Ponytail

Braided Ponytail

Sometimes simple is best. A braided ponytail looks sophisticated and chic, especially when it’s loosened to look thick and fluffy. 

Braided Ponytail

Braided Ponytail

Step 1: Begin by putting your hair into a ponytail.

Step 2: Separate your hair into three pieces and begin braiding.

Step 3: Once the braid is done, pull the hair to create a larger, fluffier braid.

Tip: Avoid pulling too hard and pulling out the braid.

Beachy Waves For Long Hair

Beachy Waves For Long Hair

Want to look like you just got back from a vacation? Using just hairspray, you can get this look pretty easily. Keep in mind that this tutorial works best with longer hair.

Beachy Waves For Long Hair

Beachy Waves For Long Hair

Step 1: Begin twisting sections of your hair individually.

Step 2: Follow it up by twisting all of your hair into one section.

Step 3: give it a good spritz. Thicker hair may need smaller sections.

Step 4: Once dry, gently shake the hair out to give it more volume.

Low Knot

Low Knot

The Low Knot is a super easy hairstyle for the days you need your hair out of your face but still want to look like you put forth a little effort.

Low Knot

Low Knot

Step 1: Part your hair into two pieces like low pigtails, but don’t use an elastic band just yet.

Step 2:  Cross the sections over each other and tie them into a knot.

Step 3: Without releasing the two pieces, tie them together one more time, and secure with an elastic band.

Step 4: Tuck the remaining hair above the knot.

Tip: You can use bobby pins or clips to make the knot even more secure.

French Twist

French Twist

The French Twist is another style that looks tough but is simple. For this style, it is best to have “dirty” hair, as freshly washed hair may not be able to hold.

French Twist

French Twist

Step 1: Begin by teasing the sides and ends of your hair for a little more volume and to help the style take shape.

Step 2: Comb back your hair as if you’re going to do a mid-pony.

Step 3: Begin rolling your hair inward, making sure the ends are tucked into the center of the bun.

Step 4: Continue rolling until you reach your head and pin back the hair as if you’re crocheting or sewing through fabric.

Step 5: Hairspray for extra hold.

Tip: Thicker hair will need extra bobby pins to secure the twist in place.

Half-Back Bun

Half-Back Bun

A half-back bun is a casual way to style your hair for everyday wear—espeially on the days when you're running short on time and heavy on dry shampoo.

Half-Back Bun

Half-Back Bun

Step 1: Start by pulling half your hair into a ponytail near the crown.

Step 2: For more volume begin teasing the hair using a comb. Gently pull it toward your head without applying too much pressure.

Step 3: Twist the hair around into a bun without pulling too tightly.

Step 4: secure the bun with a ponytail holder or another hair accessory for a completed look.k

Voluminous Locks

Voluminous Locks

Do you have thin or fine hair? You may be looking for a little bit of volume, and there’s an easy way you can achieve that with products you already have.

Voluminous Locks

Voluminous Locks

Step 1: Comb through your hair to make sure it’s tangle free.

Step 2: Begin teasing your hair at the roots, gently pulling against the hair and toward your head. Do this in small sections.

Step 3: After you’ve finished each part, use hairspray to lock the lift in place.

Tip: Tease as much as you want to get increased volume.