During the hustle and bustle of daily life, it's easy for our homes to become a breeding ground for chaos and clutter. The idea of organizing your entire living space might seem overwhelming but fear not – with a well-structured plan and a commitment to small, daily tasks, you can transform your home into a haven of tranquility in just 20 days.
This guide will take you through a day-by-day breakdown of tasks, providing actionable steps to help you declutter and organize each area of your house. In essence, your home is merely filled with smaller “homes” for your belongings – they should always return there by the end of the day! By the end of this journey, you'll not only have a tidier living space but also a sense of accomplishment and control over your surroundings.
Days 1-3: Lay the Groundwork
Before diving into specific rooms, take the first three days to establish a solid foundation for your home organization journey.
Day 1: Set Your Goals
Start by identifying your organizing goals. What areas of your home need the most attention? Are you looking to create more space, improve functionality, or declutter? Having clear goals will guide your efforts and keep you motivated throughout the process. Devote time each day to organizing tasks. Whether it's 30 minutes or a few hours, consistency is key. Create a schedule that fits your routine, making it easier to stick to the plan.
Remember: Organization isn’t about aesthetics. Focus on ridding your home of junk and creating a practical system that actually works for you, not just one that looks good on Instagram. If they overlap, that’s fine, too! There's absolutely no shame in having a beautiful and functional space.
Day 2: Gather Supplies
Collect the essential organizing supplies, such as storage bins, labels, trash bags, and cleaning supplies. Having everything you need on hand will streamline the process and prevent interruptions. Try to use materials you already own to aid the process, but don’t be afraid to scour the thrift store or purchase a few new bins along the way. As long as the new goods are practical investments.
Day 3: Start Small
First, do a general sweep of your entire home, noting which areas are the most in need of some TLC. Without digging too deep, take a trash bag and cherry-pick clutter to throw out or donate. This step will get you excited for the rest of the month as you take the first steps of deep cleaning every room in your home.
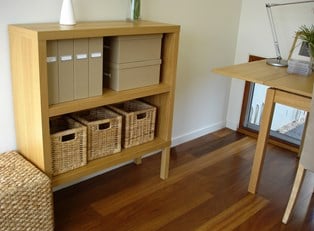
Days 4-7: Tackle the Entryway and Living Room
Here’s when the real work starts. The entryway and living room are often the first areas guests see, making them important spaces to keep tidy. While the kitchen and bathroom are also high-traffic areas, entryways and living rooms make a significant impression on what guests can expect from the rest of the home.
Day 4: Declutter the Entryway
Start small by decluttering the entryway. Clear out shoes, coats, and miscellaneous items. Consider adding hooks or a shoe rack to keep things organized. Plus, if there’s an abandoned piece of art you’ve been meaning to hang in the hallway, do it now!
Day 5: Establish a "Drop Zone"
Designate a specific area for items like keys, mail, and bags. This will prevent clutter from accumulating in other parts of the house. The best places for these zones are near your most used entrance.
Day 6: Clear Living Room Surfaces
Focus on surfaces like coffee tables and shelves. Clear away items that don't belong, dust, and arrange decorative elements in an aesthetically pleasing manner. If you’re particularly dissatisfied, remove every piece of decor from the space and focus on furniture placement (Day 7).
Day 7: Evaluate Furniture Placement
Consider the layout of your living room furniture. If it feels cramped or disorganized, experiment with different arrangements to improve flow and functionality. Getting the “flow” of your living room right will make decluttering the space much easier because you’ve rediscovered the true purpose of the living room – to relax!
Days 8-10: Conquer the Kitchen
The kitchen is the heart of the home, and an organized kitchen can significantly improve daily life. This space is particularly tricky because you have to balance decor with function. Have too many decorations, and the kitchen is a nightmare to use. But if your personality doesn’t shine through, it’s a miserable place to be in. Consider marrying the two as you declutter; yes, it’s not about aesthetics, but cute storage can motivate you to keep the kitchen clean in the long term.
Day 8: Purge and Organize Cabinets
Empty each cabinet, assess items, and declutter unused species, condiments, and Tupperware. You don’t need every plastic bowl you’ve hoarded since college. Be realistic! Do you actually use 25 mugs every week? It’s difficult, but narrow down your dishes to an appropriate amount for your lifestyle. Consider installing shelf organizers or drawer dividers to maximize space, especially if you live in a dorm or apartment.
Day 9: Tackle the Refrigerator and Pantry
Dispose of expired items, organize shelves, and create a system for categorizing pantry items. Invest in clear containers for better visibility. We all know that the fridge and pantry can both devolve into a cluttered nightmare if you don’t have a system in place. Designate genres of items to each shelf and zone. Canned goods go together, then pastas, desserts and snacks, cereals, and miscellaneous packaged products. A tasteful amount of clear organizers will keep the fridge tidy.
Day 10: Streamline Countertops
Keep only essential items on the countertops. Store bulky appliances in cabinets to create a more streamlined and visually appealing kitchen. But be practical. If you use the toaster every day, then it deserves a spot on the counter. That stack of bills, however? Those aren’t edible, so get them out of there!
Days 11-13: Master the Bedroom
A calm space equals a calm mind, and that’s especially true for bedrooms. A tidy bedroom promotes better sleep and a sense of ease.
Day 11: Declutter and Organize Closets
Sort through clothing, shoes, and accessories. Donate or discard items you no longer need, and organize the remaining items by category. The Komari Clean-up Method is especially helpful when organizing clothes and toys. In short, keep what sparks joy, and get rid of the rest! Start by gathering every piece of clothing into one giant pile and sorting through them one by one. This way, you won’t be tempted to keep a T-shirt out of convenience if it’s already hung up or folded out of sight.
TIP: When decluttering kid's closets and toys, allow your children to participate. At first, they might not be thrilled that their toys are going "bye-bye," but soon enough, they will signal which items are special to them. When children are able to express their preferences and choose which items are donated, they can gain a new appreciation for tidiness and a grasp on self-control.
Day 12: Refresh Bedding and Linens
Wash and rotate bedding and organize linens in designated storage spaces. Consider using under-bed storage containers to free space in the linen closet. For any linens that have holes, consider repairing them, but never hold on to a set of sheets that you know you’ll never use. Donating is always a valid option!
Day 13: Organize Nightstands and Dressers
Clear out unnecessary items from nightstands and dressers. Use drawer dividers to keep items organized and easily accessible. The top of dressers should be reserved for special items, not clutter. Unless it’s your designated “drop-off zone,” your wallet and keys should be out of sight.
Days 14-16: Transform the Bathroom
A well-organized bathroom creates a spa-like atmosphere and streamlines your daily routine. There’s nothing worse than running late in the morning, and you can’t find your mascara in the mountain of tubes on the counter!
Day 14: Declutter Countertops and Cabinets
Remove unnecessary items from countertops and cabinets. Ideally, your countertop is free of anything except mirrors, a hand towel, a perfume bottle here or there, and your toothbrush. If that’s not possible, this is the time to invest in storage solutions like baskets or makeup organizers.
Day 15: Sort and Organize Toiletries
Dispose of expired products and organize toiletries by category. Consider using storage bins or trays to keep everything in its place. Keep all of these items in one spot. Under the sink, on a shelf, or in the linen closet are solid options.
Day 16: Clean and Organize the Medicine Cabinet
Check expiration dates on medications, dispose of expired items, and organize the remaining medications neatly and safely. This is also a great spot for daily items, including skincare, toothpaste, and lotion.
Days 17-19: Wrangle the Home Office
The home office is only as cluttered as you allow it to be! Unfortunately, most of the items in our offices end up spread throughout the house. Whether it's bills on the kitchen island or a lanyard on your bedroom floor, we understand that it's difficult to keep work contained in one room. However, it's absolutely worth the effort to organize your office and maintain a work-life balance. If your boring responsibilities follow you around the house, you're always going to be stressed!
Day 17: Tackle Paperwork
Sort through paperwork, file important documents, and shred or recycle unnecessary papers. Consider creating a digital filing system for a more streamlined approach. This is the perfect time to invest in binders, folders, sticky labels, or a filing cabinet.
Day 18: Organize Home Office Supplies
Arrange pens, notebooks, and other office supplies in designated containers. Test materials to make sure they work. Consider implementing a storage system separated by each material, whether it’s a pencil case, bookshelf, or cabinet.
Day 19: Address Miscellaneous Spaces
Identify any remaining cluttered areas in your home, such as a laundry room, utility closet, or hallway. Tackle these spaces with the same dedication as you have for other rooms. The laundry room benefits from a dedicated area for sorting and folding clothes.
Day 20: Reflect and Maintain
On the final day, take a moment to reflect on your accomplishments. Acknowledge the effort you've put into creating a more organized home. Establish a maintenance plan to keep your spaces clutter-free, whether it's a weekly cleaning routine or a monthly decluttering session. Take a walk through your home and make final decisions on clutter!
Congratulations on completing the 20-day journey to organize your home! By breaking down the process into manageable daily tasks, you've transformed your living space into a more functional, aesthetically pleasing environment. Remember that maintaining a clutter-free home requires ongoing effort, but the benefits – increased productivity, reduced stress, and a sense of accomplishment – are well worth it. Embrace the newfound order and enjoy the peace that comes with a well-organized home.