
Not often, but occasionally, there comes a time in person's life that you will need to change out a light switch. Whether it be a broken switch, a bathroom remodel, or even building a new house, you will suddenly be challenged with saving some money by doing it yourself, or calling an electrician.
Step 1. Turn off the power to the light.
This includes the light switch itself, as well as the breaker feeding the light switch. Getting shocked is a feat better left to the daredevils. For the over-cautious, over-prepared type, this is your cue to get the fire extinguisher and keep it nearby.
Step 2. Remove the switch cover.
Take a straight screwdriver and unscrew the screw at the top and bottom of the switch cover. It is always good to lay the screws and cover aside so they don't get bumped, or even tape the screws to the switch cover so the screws don't get lost. Stick them in your pocket or balance them on your head, just don't lose them.
Step 3. Remove the holding screws from the switch.
Using your handy screwdriver, unscrew the top and bottom screws that are holding the switch firmly in the wall. Or, as the case may be for why you are replacing it, not being held firmly in the wall.
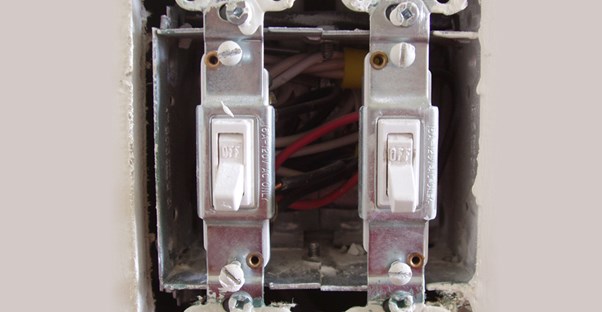
Step 4. Pull the switch out of the box very carefully.
Due to wires and contact screws being exposed, carefully pull it out of the box. If it is a multi-switch box, you don't want to disturb the other switches and wires, and end up causing yourself more electrical experience than necessary. Also, not to alarm you, but there is a slight chance that the previous installer didn't tighten the wires tightly enough and you'd hate for a bare wire to come loose from the back and slap a nearby switch causing fireworks in your honor. Sometimes, there is electrical tape wrapped around the switch which covers the gold or silver screws where the wires are connected. After pulling the switch out and away from the box, you are free to unwrap the electrical tape from around the switch.
Step 5. Disconnect the wires from the switch.
This is the tricky part. The part that is based on if you followed Step 1 to perfection and killed the power properly. The part that will keep you from looking like a Looney Tunes character being struck by lightning. Make sure the power is turned off, please. Sometimes, if the wires coming out of the box to the switch are really short, it will only serve to increase your task exponentially. Be patient. Using your screwdriver, unscrew the terminals that are holding the wires in place. Leave the wires pointing /dangling away from the switch box. If perhaps the wires are pushed into the back of the switch, then you will need to use a pair of needle nose pliers and pull the wires from out of the switch. You can always cut the wires as close as possible to the switch, but this only serves to make the wires shorter for the next step.
Step 6. Connecting the new switch.
If the ends of the wires are not already curved into hooks, then use your needle nosed pliers to make hooks out of the exposed ends. If the exposed ends are not long enough, then you might want to trim the ends a bit more before you bend them. You want to ensure that you have adequate wire underneath the screw terminals on the switch. Once you have nice curved ends, you can hook them under the screw terminals and screw the terminals down tightly on top of the wires. If you are using stranded wire, instead of solid wire, make sure to corral any stray wires after tightening to ensure that you don't short anything out. Once tightened, an optional step would be to wrap the switch terminals with electrical tape. This increases the chances of success after you complete the next step.
Step 7. Putting the new switch back in the box.
Start at the back end of the wires sticking out and GENTLY push the wires back into the box. Carefully wrangle all the wires back into the box. Be positive that you didn't nick any wires and/or cause any shorts to avoid seeing those horrible sun spots for the next 20 mins that are caused by wires touching that shouldn't be touching.
Step 8. Screw the switch back into the electrical box.
Using a screwdriver, screw in the screws that came with the new switch that have been dangling precariously during the earlier steps back into the electrical box deeply embedded into your wall.
Step 9. Put the cover back on.
Using the switch cover and the two screws that you religiously kept up with from Step 2, screw the cover back on. You are now free from your commitments of keeping up with it. Also, put the switch in the OFF position.
Step 10. Turn the power back on.
This is where things get exciting. Ok, this may be the second time things get exciting if you touched the wires and weren't sure you had the power off in Step 1. Go turn the electrical breaker back on, and listen for someone to yell. If no yelling commences, then go flip on the switch. If the light comes on, you can go put up your tools. If the light doesn't come on, then you missed a step. If there are sparks and a fire, then the over-cautious, over-prepared types will be glad that they had the fire extinguisher close by.